
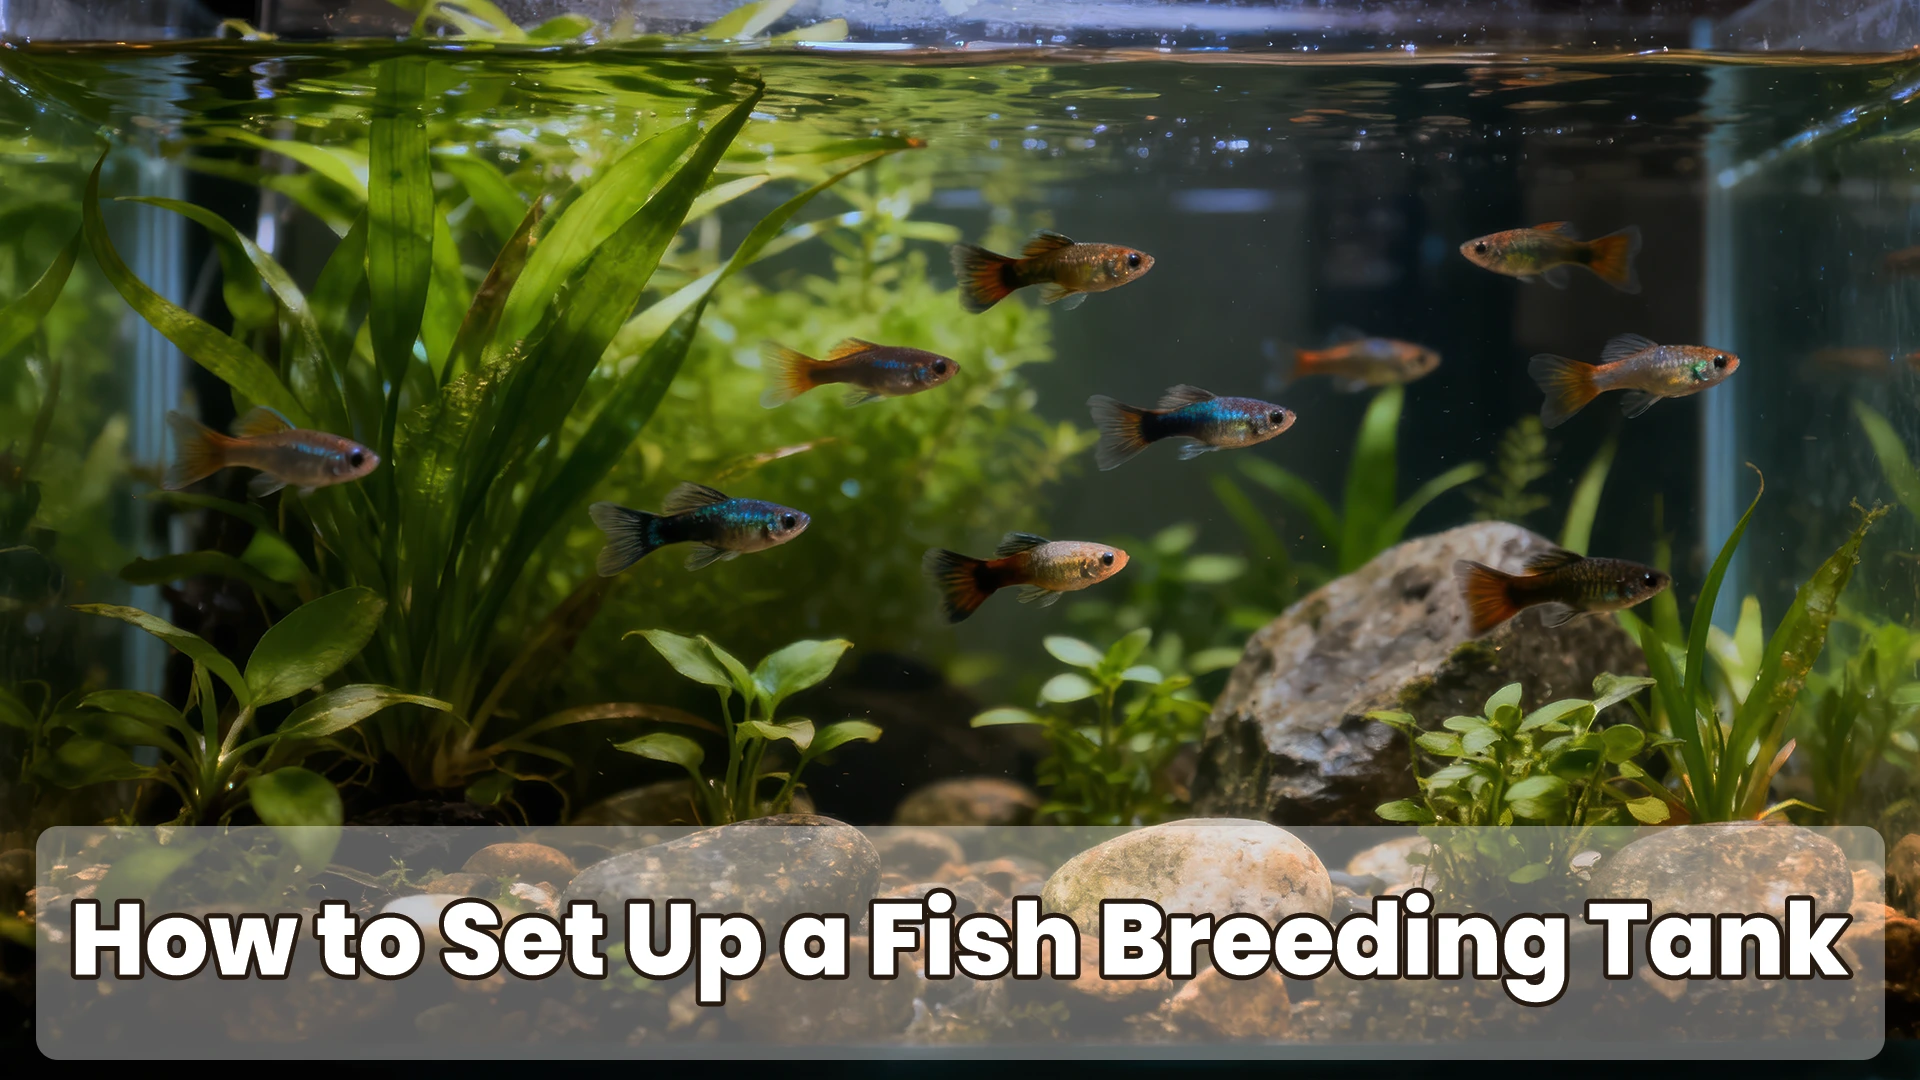
I still remember that Saturday morning like it was last week.
I’d woken up early — probably around 6:30 — made myself a cup of tea, and wandered over to my tank the way I always did first thing. Just to check. And there she was: my favourite female guppy, a beautiful blue delta-tail I’d had for about eight months, hovering near the bottom of my 20-gallon community tank. Moving funny. Shuddering a little.
And then I saw them. Tiny little specks, barely visible, darting near the gravel.
Fry. Actual baby fish. My fish had babies.
I nearly dropped my tea.
I spent the next twenty minutes with my face pressed against the glass, completely useless, just watching. Then the reality hit me — my community tank had tetras in it. And corydoras. And a dwarf gourami who I’d always assumed was the gentlest creature alive.
He was not.
By the time I grabbed a net and started panicking, most of the fry were gone. I counted two survivors. Two, out of what was probably forty or fifty born that morning. I sat on the floor next to the tank for a while after that. Not gonna lie — I felt genuinely terrible. Like I’d failed something that was counting on me.
If you’ve been through a moment like that, or you’re trying to avoid one — this guide is for you. I’m going to walk you through exactly how to set up a proper fish breeding tank, the way I wish someone had walked me through it all those years ago. No filler, no vague advice. Just the honest stuff that actually works.
Table of Contents
Why You Need a Separate Breeding Tank
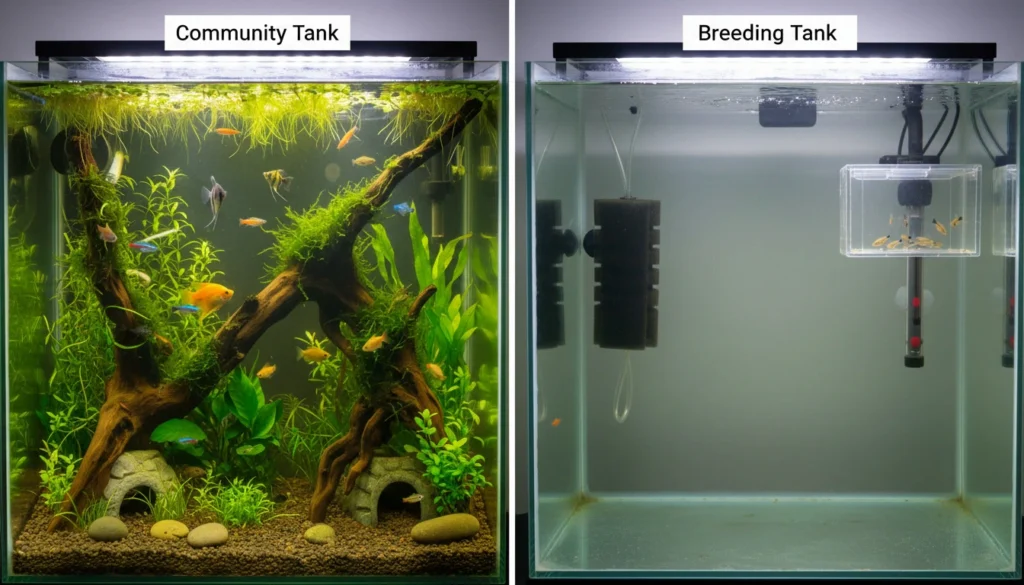
Here’s the thing I didn’t understand in those early days: a community tank is basically the worst possible place to breed fish. I thought I was being clever — “the fish are already in there, why move them?” — but I was setting everyone up to fail.
Let me tell you what happened specifically with my guppies, because I think it’ll make this click better than any explanation could.
The Community Tank Problem
After that first disaster, I did some reading and decided to try again. Same community tank, same setup. Surely the fry would survive this time if I just watched more carefully, right?
Wrong. The problem wasn’t that I wasn’t watching. The problem was the environment itself.
Community tanks are, by design, a compromise. The water parameters are set to a middle ground that keeps everyone alive but optimises for nobody. My guppies wanted slightly alkaline water — pH somewhere around 7.0 to 7.5, hardness around 10 to 20 dGH. My tetras preferred it a bit softer and more acidic. So I’d been running the tank at a pH of about 7.0, which meant my guppies were just slightly below their breeding sweet spot. Not enough to make them sick, but enough to dampen the instinct.
And the stress. That’s the thing people don’t talk about enough. Fish in a community tank are constantly navigating territory, competition, being bumped and chased and startled. That level of background stress suppresses breeding behaviour. Even when my guppies did manage to spawn, the female would drop her fry into an environment full of mouths. The tetras — which I’d always thought of as peaceful, pretty little things — turned out to be absolutely ruthless when it came to fry.
Benefits of a Dedicated Spawning Tank
A dedicated breeding tank changes everything. And I mean that — it’s not just a marginal improvement, it’s a completely different outcome.
When I finally set up a proper 10-gallon breeding tank for my guppies, my fry survival rate went from roughly 5% (two out of forty-something) to somewhere around 70 to 80%. That’s not because I suddenly became an expert. It’s because I gave the fish an environment they could actually work with — controlled temperature, gentle filtration, no predators, water dialled to their exact preferences.
You’re in charge of every variable. That’s the whole point.
When to Move Your Fish
For livebearers like guppies, mollies, and platies — watch the female’s gravid spot. That’s the dark patch near the base of her tail. When it gets very dark and starts to look almost square-shaped rather than round, she’s typically 1 to 3 days from dropping fry. Move her then, not earlier. Moving her too early causes stress; too late and she might give birth in the community tank.
For egg-layers like bettas, introduce the pair to the breeding tank together and let the courtship happen there. More on bettas specifically in a moment.
Choosing the Right Tank Size & Type
I made the tank size mistake twice before it really sank in. The first time — as I mentioned — I used my 20-gallon community tank. That was the predator problem. The second time, I overcorrected in the wrong direction.
I bought a 5-gallon tank, thinking: smaller tank, easier to manage, less water to maintain. Simple, right?
No. No, it was not simple.
What I Got Wrong With the 5-Gallon
Small tanks look easy to manage, but they’re actually harder. The water volume is so low that any spike in ammonia, any temperature fluctuation, any overfeeding — it affects the entire tank almost immediately. I had about 35 guppy fry in that 5-gallon, and over a long weekend while I was away visiting family, the ammonia crept up. I came home on Sunday evening to find about half of them gone.
I tested the water immediately. Ammonia was at 1.0 ppm — not catastrophic for adult fish, but lethal for fry that small. In a 10-gallon or larger tank, that same amount of waste would have been diluted enough to stay manageable. In a 5-gallon, there was no buffer.
Tank Size by Species
After a lot of trial and error — and a lot of reading, and honestly a lot of conversations with other breeders in online forums at midnight when I couldn’t sleep — here’s what I’ve settled on:
- Guppies, mollies, platies, and other small livebearers — 10 gallons minimum. This is the sweet spot. Enough water volume to keep parameters stable, small enough that you’re not fighting huge water changes.
- Bettas — 5 to 10 gallons. The male needs calm, relatively still water to build his bubble nest, and he needs enough space that the female has room to escape his attention if she’s not ready. I personally prefer 10 gallons for bettas — more buffer room.
- Zebra danios, white cloud minnows, and other egg-scatterers — 10 to 20 gallons depending on how many fish you’re working with.
- Angelfish, discus, and larger cichlids — 20 gallons and up. Angelfish in particular need vertical space; a standard 29-gallon tall tank is the classic choice for breeding angels.
Glass vs. Acrylic
Get glass. Honestly, unless you have a specific reason to go acrylic — you’re setting up something unusually large, or you need a custom shape — glass is just easier at the beginner level. It’s cheaper, it doesn’t yellow over time, it doesn’t scratch when you’re cleaning it with a rough sponge (which you will do, at some point, no matter how careful you try to be). Acrylic has its place, but that place is not a beginner’s breeding setup.
Why I Stopped Using Gravel
The first time I set up my dedicated breeding tank, I put a thin layer of fine sand in it because I thought it looked better. Within a week I realised I couldn’t see the fry properly — they’d sink to the bottom and disappear against the pale sand. I also couldn’t tell if there was uneaten food accumulating down there.
Go bare-bottom. It looks less “pretty,” but you can see everything, clean everything, and the fry have nowhere to hide from you when you need to count them or check on them. Most experienced breeders I know run bare-bottom breeding tanks. There’s a reason for that.
Essential Equipment for a Breeding Tank
I want to tell you about the night I ruined an entire batch of betta eggs, because I think it’ll save you from making the same mistake.
I had a beautiful male betta — a halfmoon named Rajah — who had finally built a proper bubble nest after weeks of conditioning. I introduced the female, the courtship went perfectly, and by the following morning I had what looked like hundreds of tiny white eggs tucked up inside that bubble nest. I was so excited I took a photo and sent it to my brother at 7 in the morning.
I’d set up the tank with a small hang-on-back filter. The lowest flow setting. It seemed fine.
It wasn’t fine.
The intake current — even at minimum — was just strong enough to pull the eggs away from the nest. Rajah spent the entire day desperately collecting them and trying to blow them back up into the bubbles. By that evening, exhausted and stressed, he stopped trying. Most of the eggs fell to the bottom. The ones that didn’t were unfertilised. The whole spawn was lost.
I sat there watching him just… float at the top of the tank, totally deflated, and I felt absolutely awful. He’d done everything right. I was the one who got it wrong.
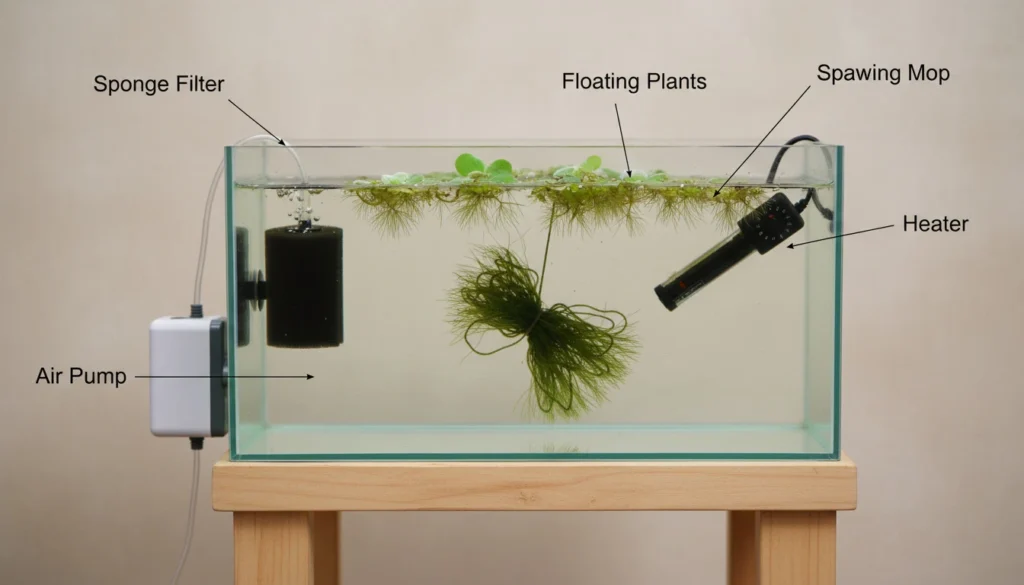
Filtration — Use a Sponge Filter. No Exceptions.
A sponge filter is the only filter I use in breeding tanks now. Full stop.
These are simple, air-driven filters — you connect them to an air pump with a bit of airline tubing, and they pull water gently through a foam sponge. No strong intake, no dangerous current, no risk of sucking up eggs or fry. The sponge itself becomes home to beneficial bacteria over time, which means your biological filtration gets better the longer you run it.
They’re also cheap. I paid less than five dollars for my first one. I’ve since bought maybe fifteen more over the years, and I still have most of them running.
Hang-on-back filters, canister filters, powerheads — all of these create too much water movement for a breeding setup. I don’t care how low you turn them. For breeding tanks, sponge filters only.
Heating
Tropical breeding fish are specific about temperature. Guppies breed most consistently at around 78°F to 80°F (25.5°C to 26.5°C). Bettas want it slightly warmer — 80°F to 82°F (26.5°C to 28°C). Drop either species below their comfort zone and they’ll simply stop showing interest in breeding.
Get an adjustable heater, not a preset one. Preset heaters lock you into one temperature — usually around 78°F — which works for some species but not others. For a 10-gallon breeding tank, a 50-watt adjustable heater is plenty. I’ve been using the same brand for years now and rarely have issues, but whatever you buy — test it for a few days before adding fish. Some heaters run a degree or two hot or cold, and you want to know that before it matters.
Lighting — Keep It Calm and Consistent
Eight to ten hours of light per day, on a consistent schedule. That’s really all there is to it. Fish pick up on light cycles as environmental cues — consistent light tells them the world is stable and predictable, which encourages breeding behaviour.
I use a basic plug-in mechanical timer on my tank lights. Bought it years ago for a couple of dollars. It clicks on at 8am and off at 6pm. The fish know the schedule; I never have to think about it.
One thing I do that made a real difference: floating plants. Hornwort, water sprite, frogbit — anything that creates dappled shade at the surface. It softens the light, gives the fish something to hide under, and makes the tank feel more like a natural environment and less like a glass box with a bulb in it. My fish visibly relax in tanks with floating cover. You can see it in how they hold their fins.
Water Parameters: The Real Secret to Successful Breeding
I’m going to be honest with you about something. For the first couple of years I kept fish, I barely tested my water. I’d do a water change every week or two, the fish looked fine, so I figured everything was okay.
Then I spent about four months trying to get my corydoras aeneus to breed. I had a pair — a chunky female and an active male who was clearly interested in her. I’d read that corydoras breed after a cool water change mimicking a rainy season. I tried it. Nothing. Tried it again, a month later. Nothing. The male would follow her around, she’d tolerate it, and then… nothing would happen.
Finally, out of sheer frustration, I did a full water chemistry test for the first time in ages. My tap water pH was 8.2. Corydoras want pH 6.5 to 7.0 for breeding. I’d been essentially asking them to breed in the wrong environment for months without realising it.
I was annoyed at myself for weeks after that.
The Parameters That Actually Matter
Here’s a reference table I wish I’d had when I started:
| Species | Temperature | pH | Hardness (dGH) |
|---|---|---|---|
| Guppy | 78–80°F (25.5–26.5°C) | 7.0–7.5 | 10–20 |
| Betta | 80–82°F (26.5–28°C) | 6.5–7.0 | 5–15 |
| Zebra Danio | 72–78°F (22–25.5°C) | 6.5–7.5 | 5–12 |
| Corydoras | 72–78°F (22–25.5°C) | 6.0–7.0 | 3–10 |
| Molly | 76–82°F (24–28°C) | 7.5–8.5 | 15–30 |
Know your species, know your tap water, and bridge the gap between them. It’s not complicated — but you have to actually check.
Cycling Your Breeding Tank (The Fast Way)
“Cycling” sounds technical, but the idea is simple: you’re growing colonies of beneficial bacteria in your filter that convert toxic ammonia (from fish waste and uneaten food) into less harmful compounds. An uncycled tank is dangerous, especially for fry, whose systems are far more sensitive than adult fish.
The fastest way to cycle a breeding tank — and this is the method I use every time now — is to seed the sponge filter. Take your new sponge filter and run it inside your main established tank for two to three weeks. The bacteria colonise the sponge. Then move the seeded sponge straight into your breeding tank. You’ve borrowed weeks’ worth of established biology and skipped most of the waiting.
If you don’t have an established tank to seed from, a bottle of bacterial starter (Seachem Stability is the one I’ve used most reliably) combined with daily water testing will get you there in about two weeks. Test for ammonia and nitrite until both read zero consistently. That’s when you know you’re ready.
Water Changes During Breeding
Once fry are in the tank, keep water changes small and gentle — about 10 to 15% every two to three days. Large sudden changes stress fry and can cause eggs to fail before they’ve had a chance to develop.
The thing I’m most careful about: temperature matching. I fill a bucket with new water and float a small heater in it for about twenty minutes before adding it to the tank. The temperature difference between old tank water and new water should be less than 1°F if you can manage it. I know that sounds fussy — but I’ve lost fry to a careless cold water change, and it only needs to happen once before you start being careful.
Plants, Décor & Conditioning Your Fish
I want to tell you about my guppy spawning mop moment, because it changed how I thought about breeding setups entirely.
I’d been running a bare-bottom breeding tank — good — with a sponge filter — good — and decent water parameters. Survival rates were okay. Maybe 40 to 50% of fry were making it. Better than the community tank disaster, but not great.
Then I made a spawning mop. Literally just a bundle of dark green acrylic yarn, tied around a small piece of cork, floating at the surface. Took me about eight minutes. Dropped it in the tank on a Thursday evening, mostly just to give the female somewhere to retreat if the male was pestering her.
By Saturday morning she had dropped her fry — and almost all of them were hiding in the yarn. Not on the glass. Not on the bottom. In the mop. Like they instinctively knew it was safer there.
That batch had a survival rate of about 65%. From adding a piece of yarn.
Best Live Plants for Breeding Tanks
- Java moss — the gold standard. Dense, forgiving, nearly indestructible, and absolutely loved by fry. They weave through it, hide in it, and pick at the micro-organisms living in it as a first food source. If you only add one plant to your breeding tank, make it java moss.
- Hornwort — fast-growing, floats easily, and creates beautiful dappled cover. Trim it before it takes over, which it will try to do.
- Water sprite — my personal favourite for livebearers. The feathery leaves trail in the water and the roots create a curtain of hiding spots. Female guppies absolutely love giving birth near water sprite roots.
DIY Spawning Mops
You don’t need to buy one. Get a skein of dark acrylic yarn from any craft shop — green or black work best because they’re less stressful visually for the fish — cut it into lengths of about 6 to 8 inches, and tie the bundle at one end around a small cork or piece of foam. That’s a spawning mop. I’ve made probably 25 of them over the years. They work identically to anything you’d buy online for five times the price.
Conditioning Your Breeding Pair
This step gets skipped by beginners more than almost anything else, and it shows. Fish that are in peak condition breed more readily, produce larger spawns, and have higher-quality eggs.
For two weeks before you move fish into the breeding tank, feed them well. Live or frozen foods are the trigger: brine shrimp, bloodworms, daphnia, white worms. Feed twice a day, small amounts they finish in two minutes. My guppies go absolutely wild for live daphnia — you can see the females’ bellies getting rounder within a few days of starting this feeding regimen. It genuinely works.
What to Do After Spawning — Fry Care Basics
The first time I had a successful guppy spawn in a proper breeding setup, I just sat there for a while watching the fry. They were so tiny — maybe 5 to 7mm long — but they were swimming properly, looking for food, acting like real fish. I counted 38 of them.
Thirty-eight. In a previous life, I’d have been lucky to save two.
It was one of those moments where all the reading and the failed attempts and the ammonia spikes and the wrong equipment suddenly felt worth it.
Here’s what to do once you’re at this point.
Remove the Parents — Immediately
I cannot stress this enough. The second a livebearer has finished dropping fry, get her out. Not in a little while. Not after you’ve had a cup of tea. Now.
I know it sounds harsh — she’s the mother, surely she has some instinct to protect them? She doesn’t. Or rather, she does have an instinct, and it’s to eat them. Livebearers are not maternal in the way we tend to imagine. The female will eat her own fry within minutes of delivering them if you don’t act.
For egg-layers like bettas, the male guards the bubble nest and tends the eggs — you leave him in until the fry are free-swimming (usually 3 to 4 days after spawning), then remove him. After that point, his instinct flips from “protect” to “eat,” and you want him out before that happens.
First Foods for Fry
Newborn fry cannot eat regular flake food. Their mouths are too small and their digestive systems aren’t ready for it. For the first 5 to 7 days, you need something smaller:
- Infusoria — microscopic organisms you culture at home by leaving boiled lettuce in a jar of tank water for a few days. Smells terrible, works brilliantly. Free.
- Micro worms — easy to culture in a small container with oatmeal. High in protein, perfectly sized for most newborn fry. Once you have a culture going, you have an endless supply.
- Egg yolk paste — a tiny pinch of hard-boiled egg yolk mixed into a few drops of tank water. Squeeze a small amount in near the fry. Old-fashioned method, still reliable.
After about a week, you can start introducing baby brine shrimp, then gradually transition to crushed flakes as the fry grow. Feed 2 to 3 times daily, and only as much as they’ll finish in a few minutes. Overfeeding is how you crash water quality in a tank full of fry.
Moving to a Grow-Out Tank
At around 4 to 6 weeks, most fry are large enough that the risk of being eaten by adult community fish is much lower. This is when you can move them to a larger grow-out tank — something in the 20-gallon range — and start growing them out to juvenile size before introducing them to your main collection. Don’t rush it. An extra week of caution in the breeding tank is always worth it.
Common Breeding Tank Mistakes (And How to Avoid Them)
Seven years in, I’ve made most of these myself. I’ve also watched other hobbyists make them on forums, in local fish club meetings, and in comments sections at various hours of the night. These are the ones that come up constantly.
The Mistakes I See Most Often
1. Skipping the cycling process. I get it — you’re excited, you want to start now. But an uncycled tank can hit 2 to 4 ppm ammonia within a week of adding fish, and at that level, fry don’t stand a chance. The two to three weeks it takes to cycle properly is not optional. It’s the difference between success and coming home to dead fry.
2. Using the wrong filter. Every week someone on a fish forum posts “why did my fry disappear?” and the answer is almost always a hang-on-back filter with an uncovered intake. It’s not visible, it’s not dramatic — the fry just vanish. Sponge filter. I’ve said it before and I’ll keep saying it.
3. Overcrowding the breeding tank. Two fish. A breeding pair. That’s the setup. I’ve seen people add “a few extra fish for company” and then wonder why nothing is breeding — it’s because the breeding pair is stressed and distracted by competition. Keep the breeding tank simple and focused.
4. Ignoring temperature consistency. A swing of even 4°F to 5°F outside the ideal range can completely shut down breeding behaviour. In the warmer months especially, tank temperatures drift upward without you noticing. Check it daily during active breeding attempts.
5. Not conditioning the fish first. Underfed, underconditioned fish produce smaller spawns with lower-quality eggs. Two weeks of good food before introducing them to the breeding tank makes a real, measurable difference. I’ve seen spawn sizes nearly double between a conditioned pair and an unconditioned one of the same species.
Signs Your Fish Are Stressed and Not Ready to Breed
Your fish will tell you if something is wrong. You just need to know what to look for:
- Clamped fins — fins held flat against the body instead of spread open. One of the earliest stress signals.
- Hiding and not interacting — if one or both fish is just wedging itself into a corner and not engaging, the environment isn’t right. Something is stressing them.
- Rapid gill movement — faster than normal breathing usually points to water quality issues or early signs of disease. Test the water immediately if you see this.
- Relentless aggression with no courtship displays — some chasing is normal and healthy during courtship. But if one fish is just attacking the other with no flaring, no dancing, no bubble-nest building — that’s aggression, not courtship. They may be incompatible, or one may simply be too stressed to think about breeding.
Honestly? If the fish don’t look comfortable, they won’t breed. I’ve had breeding pairs sit in a perfectly set-up tank for two weeks without doing anything, and then breed within 48 hours of me adjusting one thing — sometimes something as simple as adding more floating plant cover. Fish are sensitive in ways that are hard to predict. Your job is to keep making the environment better until they decide the conditions are right.
Frequently Asked Questions
How long does it take to set up a fish breeding tank before adding fish? Realistically, budget 2 to 4 weeks for a full fishless cycle. If you seed your sponge filter from an established tank first — which I always recommend — you can often get that down to 1 to 2 weeks. I know the waiting feels frustrating, but an uncycled tank is genuinely dangerous for fry. Test for ammonia and nitrite daily; when both read zero and nitrate starts appearing, you’re ready.
What’s the minimum tank size for a beginner fish breeding tank? Ten gallons for almost every beginner species. It sounds bigger than you’d expect for small fish, but the extra water volume gives you a buffer for water quality swings that a 5-gallon simply can’t provide. The one exception is bettas in a minimal setup — a 5-gallon can technically work — but I still prefer 10 gallons for the flexibility it gives you.
Do I need a heater for a freshwater fish breeding tank? Yes, with very few exceptions. Most tropical breeding fish need stable temperatures between 76°F and 82°F (24°C to 28°C) — ranges that room temperature in most homes can’t reliably maintain, especially overnight or in seasonal transitions. An adjustable 50-watt heater is relatively inexpensive and takes all the guesswork out of temperature management.
How often should I do water changes in a breeding tank with fry? Small and frequent: 10 to 15% every 2 to 3 days. Use a turkey baster or a siphon tube covered with fine mesh to pull water from the bottom without accidentally removing fry. Always pre-match the temperature of your replacement water before adding it — a sudden temperature drop of even 4°F to 5°F can kill a batch of fry quickly and without obvious warning.
Can I breed guppies and bettas in the same tank? No — and I’d really encourage you not to try. Bettas will attack guppies, particularly males, because the flowing fins on male guppies trigger their territorial instincts. Beyond the aggression issue, the ideal water parameters for the two species are different enough that you can’t properly optimise for both at the same time. They each need their own space.
Wrapping Up — You’ve Got This
Seven years ago, I was sitting on the floor next to my tank with two surviving guppy fry and a cup of cold tea, wondering where I’d gone wrong.
I didn’t have a guide like this. I had contradictory forum posts, a beginner’s book that was vague about all the important things, and the kind of optimism that makes you think you can figure it out as you go. (You can. It just takes longer and costs more fry.)
What I know now — after the failed betta spawns, the ammonia crashes, the wrong filters, the tank that was too small, the corydoras that wouldn’t breed for four months because I never bothered to test my pH — is that none of it is actually that complicated. It just requires doing a few specific things correctly, in the right order, with the right equipment.
Get a proper tank, sized for your species. Use a sponge filter without exception. Cycle before you add fish. Know your water parameters and dial them in. Condition your breeding pair on good food. Give them java moss and a spawning mop and some peace and quiet. Then step back, and let them do what fish have been doing for millions of years before you set up your first tank.
The first time you count 40 healthy fry swimming around a tank you set up yourself — I promise, it’s a feeling you won’t forget.
Go do it. You’re more ready than you think.

KD Sivanath is an aquarium enthusiast with over 7 years of experience in fish keeping and breeding. He specializes in helping beginners learn simple and effective methods for breeding popular aquarium fish. Through this blog, he shares practical tips, real-life experience, and easy-to-follow guides to help anyone start and succeed in fish breeding.