Three fry. That’s what I counted one morning.
I had started with thirty — maybe more. My guppies had given birth overnight, and I remember thinking this is it, I’m actually doing this. I watched them for an hour before bed, these tiny silver specks darting around the tank. Went to sleep feeling pretty proud of myself. Woke up, walked over to the tank, and… three. Three little fry huddled near the surface, and nothing else.
Sound familiar? If you’re here, I’m guessing you’ve had a version of that moment — and I know exactly how gutting it feels. You did everything you were supposed to do. The tank was set up. The water looked fine. And still they died.
Here’s what nobody tells you upfront: losing fry is almost never random. There are real, fixable reasons behind it — and once you know what they are, your survival rates can jump from under 10% to 70%, 80%, even higher. I’ve been keeping and breeding fish for over seven years, and I’ve made basically every mistake possible. This guide walks through every one of them — and exactly what I changed to fix things. Let’s get into it.
Table of Contents
Why Do Fish Fry Die? (The Real Reasons)
The Most Common Killers
When I first started losing fry, I assumed it was just… nature. Like, maybe some fry are meant to survive and some aren’t. That’s partially true — in the wild, fry survival rates can be as low as 1–2%. But in a well-managed home tank? You can realistically hit 70–85% survival if you know what you’re doing.
The most common causes of fry death are:
- Poor water quality — ammonia and nitrite spikes are silent killers. Even small amounts are toxic to fry whose organs are still developing.
- Starvation — fry have tiny mouths and need to eat every few hours. Missing even a day can be fatal in the first week.
- Adult fish aggression — this includes the fry’s own parents. Guppies and danios will eat their young without hesitation.
- Temperature swings — fry are far more sensitive to temperature fluctuations than adult fish. A drop of even 2–3°C can cause rapid death, especially in the first two weeks.
The Invisible Danger Nobody Talks About
Okay. I need to tell you about the HOB filter. Because this is what killed 28 of my first 30 guppy fry — and I had absolutely no idea it was happening.
HOB stands for “hang-on-back” filter, and they’re incredibly common in beginner tanks. They’re also incredibly dangerous for newborn fry. The intake tube creates strong suction that literally pulls tiny fry in. I discovered this when I cleaned my filter one afternoon and found… yeah. I don’t need to finish that sentence.
Surface agitation is another hidden issue. High surface movement from powerheads or strong airstone setups can exhaust fragile fry who are still developing their swim bladders. They spend so much energy fighting the current that they simply burn out.
Stress-Related Deaths
This one surprised me when I first learned it. Fry can die from stress — not just physical threats. Overhandling (netting them too often), sudden bright light turning on over a dark tank, overcrowding, and even loud vibrations near the tank can all spike cortisol levels and weaken immune responses in fry.
I once lost a batch just because I was moving furniture near the tank and the vibrations were constant for a few hours. I only figured this out later when a more experienced breeder in my local club pointed it out. Keep the environment calm and consistent, especially in that critical first two-week window.
Now that you know what’s killing them, let’s fix the tank first — because habitat is everything.
Fish Fry Tank Setup: Get This Right First
Separate Tank or Breeding Box?
When you’re just starting out, the question of where to put the fry trips up a lot of people. Here’s my honest take after years of trying both options:
A separate fry tank (a small 5–10 gallon is perfect for most beginners) gives fry the most space and the most stable environment. The downside is cost and setup time — you need a separate cycled tank, which takes 4–6 weeks to establish beneficial bacteria if you’re starting from scratch.
A breeding box or net (those small floating containers that hang inside your main tank) is cheaper and easier to set up immediately. They’re fine as a short-term solution — maybe the first week or two. But they restrict water flow, waste builds up fast, and fry can get stressed from the confinement pretty quickly.
My recommendation for beginners: use a breeding box for the first 7–10 days, then move fry to a dedicated small tank once you have one ready. It’s a practical middle ground.
The Sponge Filter Trick
If there’s one piece of equipment I wish someone had told me about on day one, it’s the sponge filter. This is the thing that would have saved my first 28 guppy fry.
Sponge filters work by drawing water through a foam sponge using an air pump. The foam is gentle enough that fry can’t get sucked in, and over time the sponge builds up colonies of beneficial bacteria that help process ammonia in your tank. They’re also incredibly cheap — usually under $5–10.
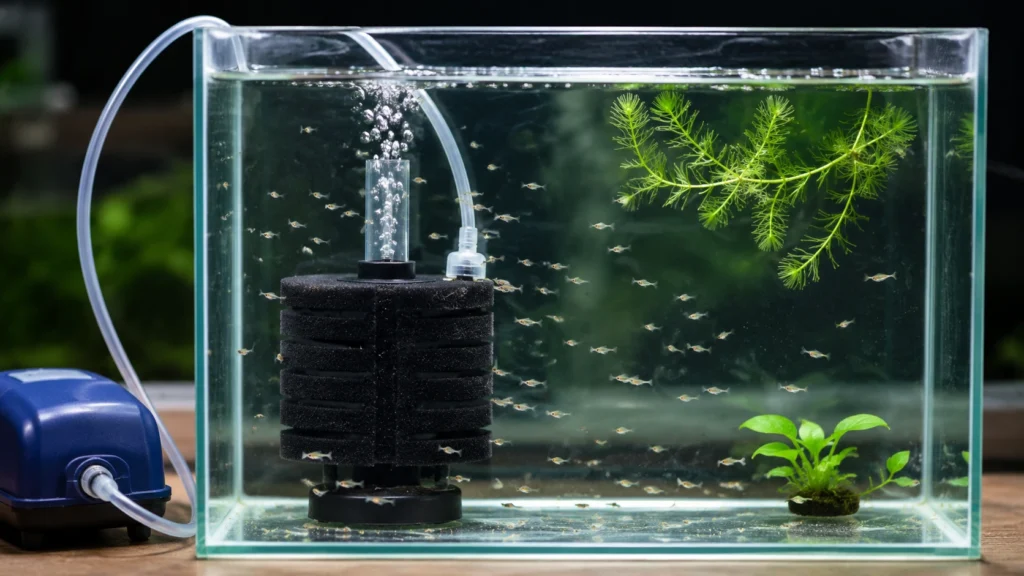
For a 5-gallon fry tank, a single small sponge filter with a basic air pump is genuinely all you need. No complicated equipment. No fancy gadgets. Just the sponge filter — and your fry will be dramatically safer.
Plants and Hiding Spots
Fry are prey animals by instinct, and they need to feel hidden to reduce stress. Live plants are ideal — java moss is my personal favourite because it creates a dense tangle of hiding spots and also naturally grows infusoria (tiny microorganisms that newborn fry can eat). Floating plants like hornwort or water lettuce also work brilliantly.
If live plants aren’t available yet, even a small clump of fake silk plants or a spawning mop will do the job in a pinch. The key is giving the fry somewhere to retreat to. A bare tank with no cover is genuinely stressful for them.
Once the tank is safe, water quality is your next non-negotiable.
Fry Water Quality Tips: Small Fish, Strict Standards
Temperature, pH, Ammonia — The Fry Danger Triangle
Did you know that ammonia levels as low as 0.25 ppm (parts per million) can start damaging fry gill tissue within 24–48 hours? I learned that the hard way. The water looked perfectly clear. There was no smell. But the API liquid test kit told the real story.
Here are the water parameters you want to hit and maintain for the most common beginner fish:
| Species | Temperature | pH | Ammonia | Nitrite |
|---|---|---|---|---|
| Guppy fry | 24–28°C (75–82°F) | 7.0–7.5 | 0 ppm | 0 ppm |
| Danio fry | 22–26°C (72–79°F) | 6.5–7.5 | 0 ppm | 0 ppm |
| Tetra fry | 24–28°C (75–82°F) | 6.0–7.0 | 0 ppm | 0 ppm |
Ammonia and nitrite should genuinely be zero. Not “low.” Zero. Fry have virtually no tolerance for either.
How Often to Do Water Changes (Without Killing Fry)
This is where I see so many beginners go wrong in both directions — either they change too much water too fast, or they change nothing and let waste build up.
What I do now: 10–15% water changes daily for the first two weeks. Small and frequent. When you change too much water at once, you risk temperature shock and pH swings that can wipe out a batch in hours. I once changed 50% of my fry tank water in one go — thinking more is better — and lost seven fry within a day. Never again.
The technique matters too. Always use pre-treated, dechlorinated water that’s been matched to the same temperature as the tank — within 1°C is ideal. Pour it slowly, ideally against the glass wall so the flow doesn’t slam into the fry directly. A clean plastic cup or a slow siphon works perfectly for this.
Testing the Water Yourself
The API Freshwater Master Test Kit is what I personally use and recommend without hesitation. It tests ammonia, nitrite, nitrate, and pH — the four things that matter most for fry survival. Test strips give rough readings; the liquid kit is far more accurate.
In the first two weeks, I test daily. After that, every 2–3 days. It takes about five minutes and has genuinely saved more of my fry than any other single habit. If your ammonia creeps above 0.25 ppm, do a 10% water change immediately — don’t wait.
Clean water keeps them alive. But to grow fast and strong, you have to feed them right.
How to Feed Fish Fry: Tiny Mouths Need the Right Food
Best Food for Fry Growth
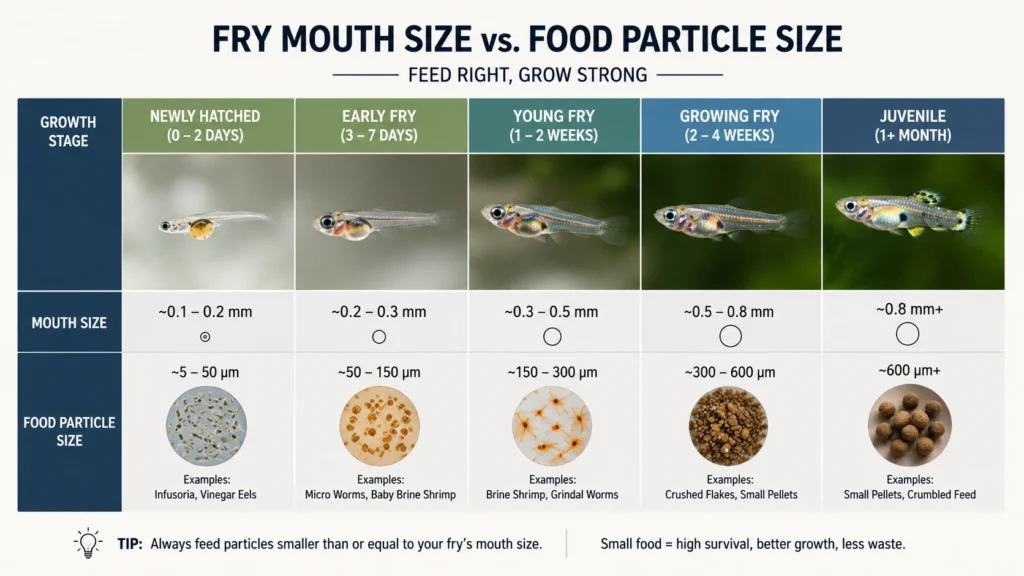
Okay, real talk: this is where I made my worst and most embarrassing beginner mistake. I bought a product labelled “fry food” from a pet shop, dusted it over the tank three times a day, and wondered why half my fry weren’t growing. Turns out the powder was just crushed flake — and the particles were still way too large for newborn guppy fry mouths, which are literally smaller than 1mm wide at birth.
Fry need food that is the right size. Here’s a rough guide by age:
- Days 1–5: Infusoria (microscopic organisms found naturally in java moss water) or commercially available liquid fry food. Particle size under 50 microns.
- Days 5–14: Micro worms, vinegar eels, or baby brine shrimp (freshly hatched). These are living foods that stay active in the water, which actually attracts the fry to eat them.
- Week 3 onward: Finely crushed flake, specialist fry powder (properly sized), or continued live foods.
Live foods — micro worms especially — genuinely transformed my fry growth rates. I started a micro worm culture in a small container with oatmeal and a little yeast. It takes about a week to get going, but once it does, you have a free, self-replenishing food source that fry absolutely love.
Feeding Frequency and Amounts
Fry have tiny stomachs and fast metabolisms. They need to eat frequently — ideally 3–5 small feedings per day in the first two weeks. I know that sounds like a lot, but each feeding should be genuinely tiny. A pinch smaller than you think is too small.
Here’s the thing about overfeeding that nobody emphasises enough: uneaten food rots within hours in a fry tank, causing ammonia spikes that can wipe out a batch overnight. Overfeeding has killed more of my fry than underfeeding ever has. When in doubt, feed less and observe — if the food is gone within 2–3 minutes and the fry are actively searching, you can add a little more.
Store-Bought Fry Food That Actually Works
If you want a reliable off-the-shelf option, I’ve had genuinely good results with Hikari First Bites — the particle size is appropriately tiny and guppy and danio fry take to it quickly. Sera Micron is another solid option, especially for smaller egg-layer fry. For livebearers specifically, I’ve also used New Life Spectrum Fry Starter with good results from around week 2 onward.
Honestly? None of them replace live foods in the first five days. But as a supplement or for busy weeks when you can’t manage a micro worm culture, they’re genuinely useful.
Feeding sorted — but even perfectly fed fry can be wiped out overnight by adult fish. Let’s talk about that.
How to Protect Baby Fish from Adults and Other Threats
Will the Mother Eat the Fry?
Yes. Sometimes. And I know that feels deeply wrong — but it’s completely natural behaviour, not a sign something is wrong with your fish.
Guppies are notorious for this. The mother gives birth to live fry (after a gestation period of 21–30 days), and within minutes she may start eating them. Danios are egg layers — they scatter eggs and will eat those too. This is why, for both species, separating the parents from the fry immediately after birth or egg fertilisation is really important.
The rule I follow: if I can’t watch the birth live, the parents get moved to a separate tank or the fry get moved within the first hour. The breeding box with a drop slot (where the mother gives birth through a divider and fry fall safely below) is one solution for guppies specifically. It works reasonably well but can stress the mother if she’s confined too long.
Mesh Dividers and Breeding Traps
Breeding traps — those small hanging plastic boxes inside the main tank — can be genuinely useful for separating fry from adults in an emergency. But I want to be honest: they also stress fry if used for too long. Limited water flow means waste builds up fast, and the confinement itself seems to slow fry growth.
My approach: use a breeding trap for the first 24–48 hours if needed, then move fry to a dedicated tank as quickly as possible. The stress from a short stint in a trap is far preferable to the alternative of being eaten by tank mates.
Lighting Schedule and Noise Stress
This is something most beginner guides skip entirely, and I think it matters more than people realise. Fry need a consistent light schedule — around 8–10 hours of light per day. Sudden bright light in a dark room (like flipping on overhead lights without warning) can startle and stress fry, especially in the first week when their nervous systems are still developing.
Keep the tank away from high-traffic areas of your home. Avoid tapping on the glass — vibrations travel strongly through water. And try to keep feeding times roughly consistent. Fry thrive on routine in a way that adult fish just don’t seem to need as much.
Now let’s talk about the big picture — improving your fry survival rate over time, batch by batch.
Improving Fry Survival Rate: A Simple Weekly Checklist
Your 7-Point Weekly Routine
After years of keeping track of what actually moved the needle on fry survival, I distilled it down to this. Do these seven things every week and your results will consistently improve:
- Test water parameters — ammonia, nitrite, pH. Minimum every other day in week 1 and 2.
- Do a partial water change — 10–15% daily (or at minimum every other day). Pre-treat and temperature-match.
- Clean the sponge filter — rinse gently in old tank water (never tap water, which kills beneficial bacteria). Do this weekly.
- Count your fry — not obsessively, but keep a rough idea so you notice immediately if numbers drop.
- Observe feeding behaviour — are fry actively chasing food? Are they hovering at the surface (stress sign)? Watching them eat tells you a lot.
- Check the filter and airflow — make sure the sponge filter is running smoothly and the intake isn’t clogged.
- Log your observations — seriously, even just a note in your phone. “Day 7: 24 fry, water 0/0, fed 4x” takes 30 seconds and helps you spot patterns over time.
When to Celebrate Small Wins
Two weeks. If your fry make it to two weeks, breathe a little easier. That first fortnight is genuinely the highest-risk window — after that, fry are significantly more resilient.
Four weeks means they’re juveniles. You’ll start seeing colour develop in guppies around this time, which is honestly one of the most satisfying moments in fish breeding. It never gets old for me — seeing that first hint of tail colour emerge on a fish I’ve raised from birth.
The batch I almost gave up on — a group of guppy fry I nearly siphoned out because I thought they weren’t going to make it — those are now my healthiest, most colourful adults. Don’t give up too early.
Frequently Asked Questions
Why do my fish fry keep dying even when the water looks clean?
“Looking clean” and actually being safe for fry are two completely different things. Ammonia can be at toxic levels — 0.5 ppm or higher — with no visible signs whatsoever. In the first week of a new tank, ammonia spikes are extremely common because the beneficial bacteria haven’t established yet. Get a liquid test kit (not strips) and test your water before assuming it’s the cause. Also double-check your filter — HOB and canister filters with strong intake suction are a major hidden killer.
How long does it take for fish fry to be out of danger?
The first two weeks are the most critical window, with the first 72 hours being highest-risk of all. After 14 days, fry are significantly stronger and more resilient. By 4–6 weeks, most species are considered juveniles and can handle a wider range of conditions. Guppy fry, for example, reach sexual maturity at around 3–4 months.
What is the best food for newborn fish fry — especially guppies and danios?
For the very first days (1–5), infusoria or commercial liquid fry food with ultra-fine particles is ideal — most fry mouths are under 1mm wide at birth and can’t handle anything larger. From day 5 onward, micro worms, vinegar eels, or freshly hatched baby brine shrimp are excellent live food options. Store-bought powders like Hikari First Bites work as supplements but shouldn’t replace live food in the early days.
Should I always separate fry from adult fish?
For livebearers like guppies and mollies — yes, almost always. The parents will eat fry without hesitation. For some egg-laying species like certain cichlids, parents actually protect the eggs and fry, so removing them would be counterproductive. It really depends on the species. When in doubt, separate them. You can always reintroduce adults once the fry are large enough not to be eaten — usually around 1–1.5cm body length.
How many water changes do fry need, and how do I do them safely?
In the first two weeks, I do 10–15% daily. After that, 20–25% every 2–3 days is usually sufficient. The method matters as much as the frequency: always pre-treat the water with dechlorinator, match the temperature to within 1°C of your tank, and pour it slowly against the glass wall so you don’t blast the fry with a direct current. Never vacuum gravel near newborn fry — use a slow hand siphon or a turkey baster to remove surface waste instead.
One Last Thing Before You Go
Seven years in, and I still feel a small pang every time I lose a fry I was rooting for. That feeling doesn’t entirely go away — and honestly, I think it means you care, which is exactly what your fish need.
What I want you to take from this isn’t a perfect system. It’s the understanding that fry deaths are almost never mysterious — they have causes, and those causes are fixable. Get the sponge filter. Match your water temperature before changes. Feed small and often. Separate the parents early. Test the water even when it looks fine. Do these things consistently, and you will see your survival rates improve — batch by batch, week by week.
If there’s one thing I want you to walk away with, it’s this: the difference between 10% survival and 80% survival usually isn’t expensive equipment or expert-level knowledge. It’s a handful of small habits done consistently. You can absolutely do this. And when that first batch of fry makes it to four weeks and you see colour starting to show — you’ll know exactly why it was worth it.
— Kd Sivanath has been breeding freshwater fish for over 7 years, with a focus on livebearers and community tank species. Questions or experiences to share? Drop them in the comments below.

KD Sivanath is an aquarium enthusiast with over 7 years of experience in fish keeping and breeding. He specializes in helping beginners learn simple and effective methods for breeding popular aquarium fish. Through this blog, he shares practical tips, real-life experience, and easy-to-follow guides to help anyone start and succeed in fish breeding.