I still remember that Tuesday morning like it was last week.
It was around 6 AM. I hadn’t even made coffee yet. I walked straight to my breeding tank — the way I always do — and there they were. A beautiful cluster of danio eggs stuck to the java moss, exactly where I’d hoped they’d be. I literally pumped my fist in the air. My wife thought I’d lost my mind.
That was Day 1.
By Day 4, nothing had happened. The eggs just… sat there. A few had turned white. I started panicking. I started Googling “fish eggs not hatching” at 11 PM while everyone else in the house was asleep, convinced I had done something catastrophically wrong.
Sound familiar? Yeah. I’ve been there — more times than I’d like to admit.
Here’s the thing though: most of the time, fish eggs not hatching comes down to a small handful of fixable problems. What if the fix is simpler than you think? In this guide, I’m going to walk you through exactly what went wrong and — more importantly — what you can actually do about it. I’ve been keeping and breeding freshwater fish for over seven years now, and I’ve made pretty much every mistake in the book so you don’t have to.
Before we jump into the fixes, let’s look at the most common reasons eggs don’t hatch — because knowing the “why” makes the “how” a whole lot easier.
Table of Contents
Why Are Fish Eggs Not Hatching? (The Real Reasons)
With my first danio batch, I managed to make almost every mistake on this list — sometimes on the same day. I’m not even joking. So if you’re reading this feeling like you’ve completely messed up, please know: you’re in good company.
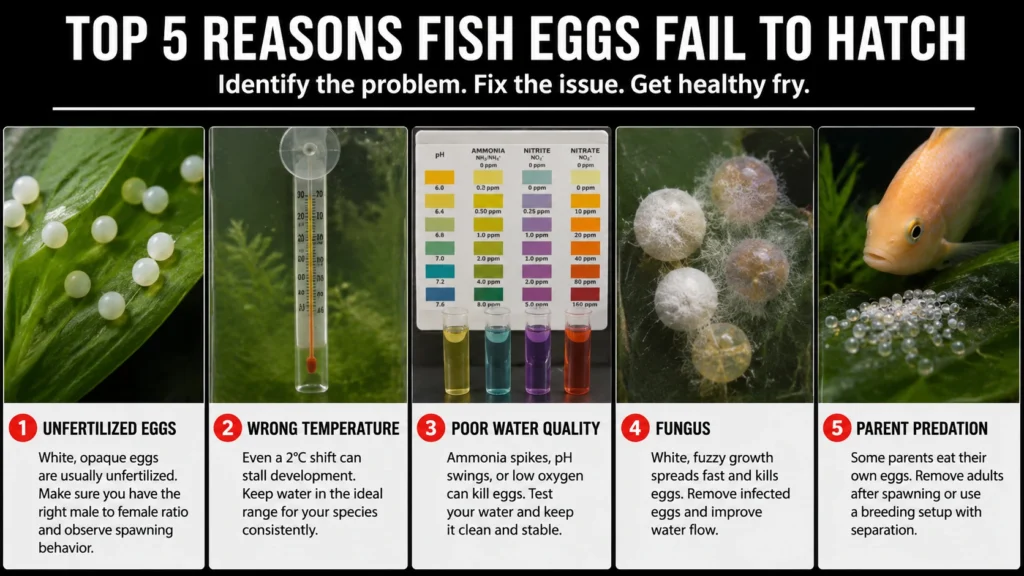
Unfertilized Eggs
White eggs are almost always dead eggs. That’s the hard truth, and the sooner you know it, the better.
When eggs don’t get fertilized during spawning, they turn white and opaque — sometimes within hours. It’s easy to mistake them for slow developers, but they’re not going anywhere. For most egg-laying species, you need at least one male for every two females to get decent fertilization rates. With zebra danios, for example, I usually run a 2:1 male-to-female ratio and get roughly 80–90% fertilization on a good spawn.
Watch your fish during spawning too. You want to see chasing behavior, the male pressing against the female’s side, and both fish darting through plants or a spawning mop together. If none of that happened — or you weren’t watching — some white eggs are pretty much guaranteed. Not all of them, but some. That’s normal. A completely white clutch, though? That’s a fertilization problem.
Wrong Water Temperature
Even a 2°C shift from the ideal range can stall egg development completely. I know that sounds dramatic, but embryos developing inside those tiny eggs are incredibly sensitive to temperature fluctuations.
Here’s a quick reference I keep taped above my breeding rack:
| Species | Ideal Breeding Temp | Egg Hatch Time |
|---|---|---|
| Zebra Danio | 22–26°C (72–79°F) | 48–72 hours |
| Neon Tetra | 24–27°C (75–81°F) | 24–36 hours |
| Corydoras | 23–26°C (73–79°F) | 3–5 days |
| Betta | 26–28°C (79–82°F) | 24–72 hours |
| Angelfish | 26–30°C (79–86°F) | 48–60 hours |
Is your heater actually doing its job — or just pretending to?
I ask because mine was lying to me for almost three months. My display read 25°C constantly. My digital probe thermometer — the one I eventually bought after losing a batch — said 22°C. Three degrees off. Enough to explain why my eggs kept stalling. If you’re using those stick-on liquid crystal strips that came with your tank, please replace them. A decent submersible digital thermometer costs about $8 and it’s one of the best investments I’ve made in this hobby.
Poor Water Quality
This one is sneaky because the tank can look fine and still be killing your eggs.
Ammonia spikes are probably the most common culprit. If you’re leaving the breeding pair in the tank after spawning — especially if you’ve been feeding them well to condition them — their waste will spike ammonia fast. I once left a pair of corydoras in my 5-gallon breeding tank for 12 hours post-spawn because I got busy with work. By the time I removed them and tested the water, ammonia was at 0.5 ppm. Not lethal for adults, but definitely harmful to developing eggs.
pH swings matter too. Most small freshwater species want a pH between 6.5 and 7.2 for successful egg development. Anything outside that range mid-incubation can cause developmental failure. And low oxygen — something people rarely check — means the eggs literally can’t get what they need to develop. I’ll come back to aeration in a bit.
Which brings me to the culprit that beginners almost always miss — and it can wipe out an entire clutch overnight. Let’s talk about fungus.
Fish Eggs Turning White? That’s Probably Fungus
I lost over 300 corydoras eggs to fungus once. Three hundred. I’d been so excited — corys lay in clusters and mine had gone absolutely wild, eggs plastered all over the glass and the filter intake. Two days later, most of them were white and fuzzy and it was heartbreaking.
I didn’t catch it in time. Here’s how to make sure you do.
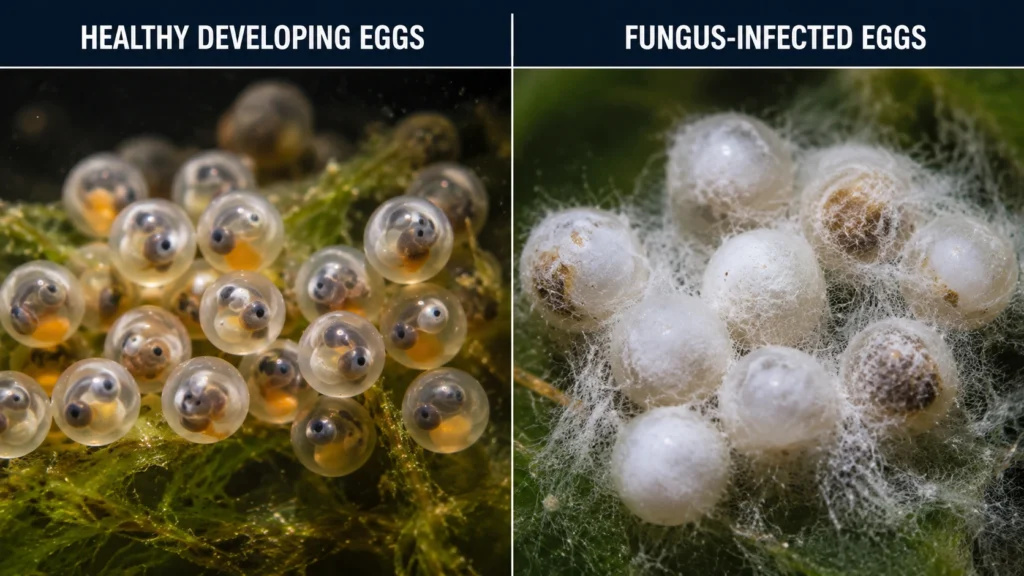
How to Identify Egg Fungus
Here’s the key distinction that took me way too long to learn:
- Unfertilized eggs = smooth, white, slightly opaque
- Fungused eggs = white and fuzzy, with a cotton-like halo around them
- Healthy developing eggs = translucent to slightly amber, darkening over time, with a visible dark dot (the embryo) appearing within 24–48 hours
Not sure if that white egg is just slow to develop or already gone? Look closely — fuzzy means fungus. And fungus spreads fast. One infected egg pressed against healthy neighbors can spread the contamination within hours. This is not the time to wait and see.
Fish Egg Fungus Treatment
The moment you see a white fuzzy egg, remove it. Immediately. Use a clean pipette or a small turkey baster — gentle suction, precise placement. Don’t use your fingers or anything that hasn’t been rinsed in tank water first.
Once the dead eggs are out, here’s what I reach for:
Methylene blue is my first choice every time. It’s an anti-fungal and mild antibacterial that’s been used by fish breeders for decades. I add 1–2 drops per gallon directly to my breeding tank. It turns the water a vivid blue (your fish are fine — it looks scarier than it is). Just don’t use it in a tank with an active biological filter, because it will hammer your beneficial bacteria.
Indian almond leaves are my backup — or more accurately, my preventive measure. I drop half a leaf into every breeding tank before the spawn even happens. The tannins they release have natural antifungal properties and they also help bring the pH down to a slightly acidic range that many tropical species prefer anyway. Win-win.
Seachem Paraguard works well too if you’re dealing with a persistent fungus problem. Just follow the dosing instructions carefully and watch your fish for any stress signs.
Treating fungus helps — but real protection starts before the eggs are even laid. Let’s talk about your setup.
Breeding Tank Setup — Getting the Environment Right
You wouldn’t try to hatch chicken eggs in a microwave. Your fish eggs need just as specific conditions — and honestly, once you nail the setup, everything else gets easier.
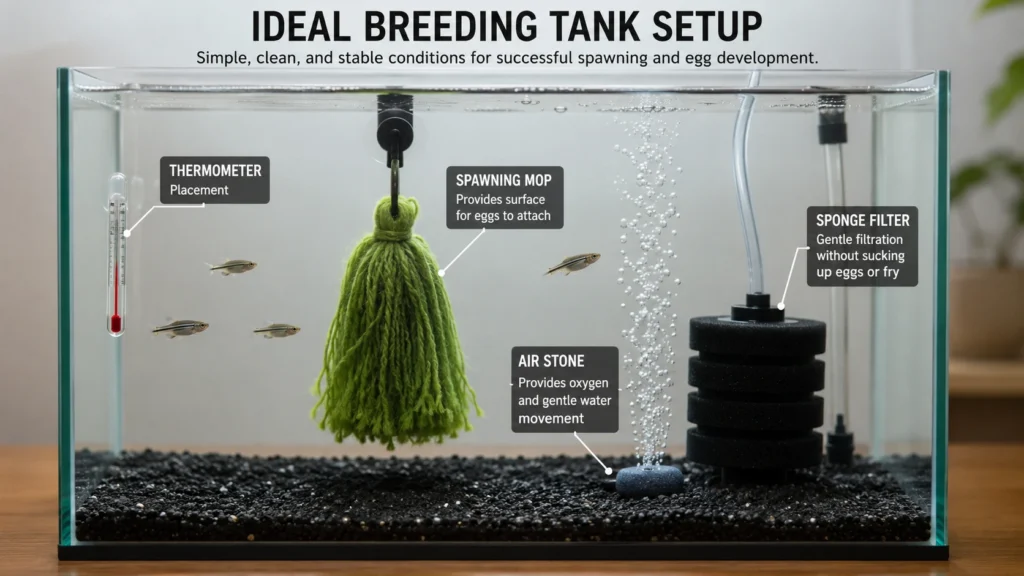
Tank Size, Filtration & Lighting
For most small freshwater species — danios, tetras, corys, small livebearers — a 5 to 10-gallon dedicated breeding tank is ideal. Big enough to give the fish room to spawn naturally, small enough that you can control the environment precisely.
Use a sponge filter. Full stop. A hang-on-back filter with an intake tube will suck up eggs and fry without a second thought. Sponge filters provide gentle flow, biological filtration, and zero suction risk. They also double as a food source for fry later (the biofilm that grows on them is excellent first food). I’ve been using the same basic dual-sponge filter setup for five years and it’s never let me down.
Keep lighting low or off during incubation. Some species — bettas especially — are sensitive to bright light over the nest. I drape a thin cloth over the back and sides of the tank to diffuse ambient light. It takes thirty seconds and it genuinely seems to help.
Aeration & Oxygen Levels
A gentle air stone placed near the egg cluster — not directly on it — makes a real difference in hatching rates. The gentle water movement keeps oxygen levels up around the eggs and prevents stagnant pockets from forming.
The key word is gentle. I made the mistake once of pointing an air stone directly at a betta bubble nest. Within an hour, the nest was destroyed and the eggs were scattered. Low flow, indirect placement. That’s the goal.
Removing the Parents
Real talk: your fish are not great parents. At least, most of them aren’t.
Egg-scattering species — danios, tetras, rasboras, most barbs — will absolutely eat their own eggs given half a chance. Remove them within one to two hours of spawning. Some breeders pull the parents immediately after the spawn is done. I usually watch for a few minutes to confirm spawning has finished, then move them out.
The exceptions are mouthbrooders (like some cichlids) and bubble nest builders like bettas. These guys are genuinely attentive parents and should usually be left in. Male bettas in particular will tend the nest obsessively — removing him can actually harm hatch rates. Know your species before you make the call.
With the tank sorted, let’s get into the actual incubation process — because timing matters more than most beginners realize.
How to Hatch Fish Eggs — Step-by-Step Incubation Guide
Think of incubation as the egg’s to-do list — and your job is mostly to stay out of the way and keep an eye out for problems. The temptation to intervene is real. Resist it.
How Long Do Fish Eggs Take to Hatch?
Hatch time varies a lot by species, and temperature is the single biggest variable. Warmer water within the safe range speeds up development — sometimes significantly. Danio eggs, for instance, will hatch in about 48 hours at 24°C but can push closer to 72 hours at 22°C.
The table from the temperature section above gives you a solid baseline. Use it as a starting point, not a guarantee.
Daily Maintenance During Incubation
Here’s my actual daily routine during incubation:
- Check temperature first thing in the morning and again in the evening
- Scan for white or fuzzy eggs — remove immediately with a pipette
- Avoid disturbing the tank — no tapping, no rearranging, no lifting decorations
- Every two days, do a 10–15% water change with conditioned water that matches the tank temperature exactly. Temperature shock from a cold water change has killed more egg batches than most people realize.
- Don’t feed any other fish in or near the breeding tank during this period — excess food is an ammonia time bomb.
That’s really it. The eggs need stability more than anything else.
Signs the Eggs Are Developing
This is the part I genuinely love. Watching eggs develop is one of those small magic moments this hobby gives you.
Within 12–24 hours of a successful spawn, healthy eggs will start to shift in appearance — from clear or slightly white to a more amber or golden tone. By 24–48 hours, if you look closely (a magnifying glass helps), you’ll start to see a tiny dark dot inside each egg. That’s the embryo’s eye forming.
Once you see that dark dot, something is alive in there. That single moment — after all the anxiety and the midnight Googling — makes every bit of it worth it.
Even with perfect care, not every batch will succeed. Here’s how experienced breeders improve their odds — and what they do differently.
How to Improve Fish Egg Survival Rate (Pro Tips)
After losing three batches in a row — two to fungus and one to temperature problems — I sat down and made myself actually think through what I was doing wrong instead of just trying again. That shift in approach changed everything. None of what I found was expensive or complicated. It was mostly just being more intentional.
Conditioning the Breeding Pair
You can’t expect peak spawning performance from fish that are just… existing in your tank. Conditioning is the process of preparing your breeding pair to spawn — and it makes a genuinely significant difference in egg quality and fertilization rates.
Two weeks before I plan to breed, I start feeding the pair live or frozen high-protein foods: brine shrimp, daphnia, bloodworms, and micro worms. I also separate the males and females during this conditioning period. This builds spawning eagerness in the males and lets the females develop mature, high-quality eggs without the stress of constant male attention.
Right before introducing them together, I do a 25–30% water change with slightly cooler water. This mimics the onset of the rainy season — a natural spawning trigger for many tropical species. In my experience, this single change increases spawning success rate noticeably.
Using Methylene Blue Prophylactically
I mentioned methylene blue in the fungus section, but it’s worth talking about using it preventively — before any fungus appears.
At the start of incubation, I add a low dose (1 drop per gallon) to my breeding tank even if everything looks healthy. It creates an environment where fungus struggles to take hold in the first place. At this concentration it’s safe for eggs and doesn’t seem to affect hatch rates.
Stop the treatment as soon as the eggs start hatching. Fry are more sensitive than eggs, and higher concentrations can stress them.
Record-Keeping and Learning from Each Batch
What I mean is — actually, let me put this plainly: write things down.
I keep a simple notebook next to my breeding rack. Date, species, water temp, pH at spawn time, number of eggs (rough estimate), any treatments added, hatch rate, fry survival at one week. Takes two minutes per entry.
Over time, patterns emerge. You’ll notice that your corys always spawn better after a cool water change. You’ll realize your hatch rate drops in winter when your room temp drops and the heater struggles. My worst hatch ever — a devastating 4% hatch rate on a batch of angelfish eggs — taught me that my heater was lying to me by 3°C. I would never have caught that without the data showing me something was consistently wrong.
Let’s pull everything together into a quick checklist you can screenshot or print for your next breeding attempt.
Fish Egg Care Quick-Reference Checklist

Before Spawning
- Condition the breeding pair with high-protein live or frozen food for 7–14 days
- Separate males and females during conditioning
- Set up the breeding tank — sponge filter, no strong current, stable temperature
- Test water parameters — temperature, pH (target 6.5–7.2 for most species), ammonia at 0 ppm
- Add spawning media — java moss, spawning mop, slate, or species-appropriate surface
- Prepare methylene blue solution so it’s ready to add immediately after spawning
During Incubation
- Remove parents within 1–2 hours of spawning (egg-scattering species)
- Add methylene blue at 1 drop per gallon as a preventive measure
- Check temperature twice daily — morning and evening
- Remove white or fuzzy eggs immediately using a clean pipette
- Do 10–15% water changes every 2 days with conditioned, temperature-matched water
- Minimize disturbance — no tapping the glass, no rearranging the tank
After Hatching
- Wait 24–48 hours before feeding fry — they absorb their yolk sac first
- First foods: infusoria, liquid fry food, vinegar eels, or micro worms — not flake or pellets yet
- Small daily water changes — 10% per day, careful with suction near fry
- Maintain temperature in the same range used during incubation
- Watch for fry that aren’t swimming properly — they may need more time or have developmental issues
Frequently Asked Questions
How long does it take for fish eggs to hatch?
It depends on the species and your water temperature. Neon tetra eggs typically hatch in 24–36 hours, corydoras eggs take 3–5 days, and betta eggs in a bubble nest usually hatch within 24–72 hours. Temperature is the biggest variable — warmer water within the safe range speeds things up. If your eggs are past the expected hatch window and still nothing has happened, temperature and water quality are the first things I’d check.
Why are my fish eggs turning white?
White eggs are either unfertilized or infected with fungus — and sometimes both. Unfertilized eggs turn white and stay smooth. Fungused eggs go white and develop a fuzzy, cotton-like halo around them. Remove white eggs as soon as you spot them. Leaving them in the tank gives fungus a chance to spread to healthy eggs nearby, and that can destroy an entire clutch in under 24 hours.
What is the best fish egg fungus treatment?
Methylene blue is my go-to — it’s been used by breeders for decades, it’s inexpensive, and it works. Add 1–2 drops per gallon directly to the breeding tank. Indian almond leaves are a solid natural alternative and work well as a preventive measure. Whatever you use, always remove dead eggs manually first. No treatment can save an already-dead egg, and leaving them in just creates more surface area for fungus to spread.
Should I remove the parents after eggs are laid?
For egg-scattering species — tetras, danios, rasboras, most barbs — yes, remove parents within an hour or two of spawning. They will eat the eggs. Cichlids and bettas are a different story. Many cichlid species are excellent parents that guard and fan their eggs actively, and male bettas tend their bubble nests with impressive dedication. Removing a betta male from his nest often causes the eggs to fail. Know what species you’re working with before making the call.
Can I save eggs that look dead?
Sometimes. Clear or slightly amber eggs with a visible dark dot inside are almost certainly still developing — leave them alone. White, smooth eggs are probably unfertilized and should come out. White fuzzy eggs are definitely fungused and need to go immediately. If you genuinely can’t tell, leave the egg for another 24 hours and check again. When in doubt, err on the side of leaving it — removing a healthy egg is worse than leaving a dead one for an extra day.
One Last Thing
Seven years ago, I was the person Googling “fish eggs not hatching” at midnight, genuinely unsure if I was cut out for this hobby.
Now I’ve hatched danios, neon tetras, corydoras (hundreds of them, after I figured out the fungus situation), angels, and more guppies than I can reasonably count. And honestly? The batches that failed taught me more than the ones that went perfectly.
If there’s one thing I want you to walk away with from this guide, it’s this: fish breeding has a learning curve, and losing a batch doesn’t mean you failed. It means you’re gathering data. Every white egg you remove, every temperature log you write down, every spawn that goes wrong is moving you closer to the one that goes right.
Check your temperature. Remove dead eggs fast. Give those embryos stable, clean water and a little time. Most of the time — not always, but most of the time — that’s enough.
You’ve got this. And if you’re still stuck after trying everything here, drop a comment and tell me exactly what’s happening. I read all of them, and I’m happy to troubleshoot with you.
Written by Kd Sivanath — freshwater fish keeper and breeder for 7+ years, specializing in small tropical species.

KD Sivanath is an aquarium enthusiast with over 7 years of experience in fish keeping and breeding. He specializes in helping beginners learn simple and effective methods for breeding popular aquarium fish. Through this blog, he shares practical tips, real-life experience, and easy-to-follow guides to help anyone start and succeed in fish breeding.