
Water quality is the single most decisive factor in whether a fish breeding project succeeds or quietly fails. Long before fry color up, grow fins, or start behaving like the adults you were hoping to raise, they depend entirely on one thing: clean, stable water. Eggs can’t survive fluctuating ammonia. Newly hatched fry can’t tolerate the same water conditions their parents shrug off. And breeding pairs under stress from poor water rarely spawn successfully, no matter how perfect their diet or tank setup looks on paper.
Most beginner breeders don’t lose fry to disease, aggression, or bad genetics. They lose them to invisible water chemistry problems — ammonia spikes they didn’t test for, water changes done too aggressively, or filtration that was never appropriate for a fry-safe environment. These mistakes are common, understandable, and almost always preventable once you understand what’s actually happening inside that tank.
This guide breaks down exactly how breeding tank water quality works, why fry are so much more vulnerable than adult fish, and what a realistic, sustainable maintenance routine looks like. By the end, you’ll understand the nitrogen cycle well enough to troubleshoot your own tank, know which parameters actually matter, and have a practical system for testing, filtering, and changing water without guessing your way through it.
Whether you’re setting up your first breeding tank or trying to figure out why your last spawn didn’t survive, this article is built to answer both the “why” and the “how” — not just hand you a checklist.
Why Water Quality Makes or Breaks Fish Breeding
Successful fish breeding is often misunderstood as being primarily about getting fish to spawn. In reality, most healthy, well-conditioned fish will spawn given reasonable conditions — livebearers especially need very little encouragement. The real challenge, and the stage where most beginner breeders lose their results, is keeping the water clean enough for eggs and fry to actually survive past the first few days.
The Hidden Killer — Ammonia, Nitrite, and Nitrate Explained
Every bit of fish waste, every uneaten food particle, and every bit of decaying plant matter breaks down into ammonia (NH₃). In a properly established aquarium, colonies of nitrifying bacteria convert that ammonia into nitrite (NO₂⁻), and a second group of bacteria then converts nitrite into nitrate (NO₃⁻) — a far less toxic compound that gets diluted through routine water changes. This three-stage process is known as the nitrogen cycle, and understanding it is non-negotiable for anyone serious about breeding fish.
Why does this matter so much for a breeding tank specifically? Because breeding tanks are usually small, frequently bare-bottomed for easier fry viewing and cleaning, and often set up quickly for a spawning event rather than cycled over weeks like a display tank would be. That combination — low water volume, minimal biological filtration, and high waste output relative to tank size — makes ammonia spikes far more likely and far more dangerous than in a typical community tank.
According to water quality research published by university extension aquaculture programs, ammonia becomes toxic to fish at concentrations far lower than most beginners assume — often well below 1 part per million (ppm), with sensitivity varying significantly by species and life stage.
What beginners usually get wrong: They assume that if water looks clear and the fish appear to be swimming normally, everything is fine. Ammonia has no smell, no color, and produces no immediate visible symptoms in its early stages — which is exactly why testing, not observation, has to be the standard.
How Fry Are More Sensitive Than Adult Fish
Adult fish have fully developed gills, kidneys, and detoxification systems that allow them to tolerate brief exposure to imperfect water conditions. Fry do not. Their gill structures are underdeveloped, their organs are still maturing, and their surface-area-to-body-mass ratio makes them far more susceptible to absorbing toxins directly through their skin and gills.
This is precisely why a tank that seems perfectly livable for adult fish can quietly wipe out an entire batch of fry within 24 to 48 hours. Fry mortality from poor water quality is often silent — there’s no visible wound, no obvious illness, no dramatic warning sign. One day they’re active and feeding; the next, several are gone.
Best practice: Treat any breeding or fry-rearing tank as though it requires a stricter water quality standard than your main display tanks — because it does.
Real-World Example: A Betta Breeder’s Wipeout
In fish breeding communities, one of the most common stories shared by frustrated beginners involves betta breeders who lose 100+ fry within days of hatching, despite feeding correctly and maintaining stable temperature around 80°F (26.5°C). In nearly every case, the underlying issue traces back to skipped or delayed water changes in a tank that looked clean but had been quietly accumulating ammonia for a week or more. The lesson is consistent across species: visual clarity is not a reliable indicator of water safety.
Understanding what’s happening chemically in the water is only the first step. Next, you need to know exactly which parameters to measure and what “safe” actually looks like.
Essential Water Parameters Every Breeder Should Monitor
Water testing is the difference between guessing and knowing. A tank can be crystal clear and still contain enough ammonia or nitrite to threaten an entire spawn — the only way to catch this before it becomes a crisis is regular, accurate testing.
Ammonia, Nitrite, Nitrate — Safe Ranges for Breeding Tanks
For a breeding or fry-rearing tank, target the following:
| Parameter | Safe Range | Danger Threshold |
|---|---|---|
| Ammonia (NH₃/NH₄⁺) | 0 ppm | Above 0.25 ppm requires action |
| Nitrite (NO₂⁻) | 0 ppm | Above 0.25 ppm is stressful to fry |
| Nitrate (NO₃⁻) | Under 20 ppm | Above 40 ppm affects sensitive species |
| pH | Species-dependent (6.5–7.5 typical) | Sudden shifts of 0.3+ within a day |
| Temperature | Species-dependent | Swings greater than 2–3°F in a day |
Why this matters: Ammonia and nitrite are both directly toxic even at low concentrations, damaging gill tissue and interfering with a fish’s ability to absorb oxygen. Nitrate is far less dangerous but still contributes to long-term stress and reduced fry growth rates at elevated levels.
pH, Temperature, and Hardness for Different Species
Different species have evolved in different natural water conditions, and matching those conditions in captivity often determines whether spawning occurs at all — let alone whether eggs survive.
| Species | Ideal Temperature | pH Range | Typical Spawn Size |
|---|---|---|---|
| Guppies (livebearer) | 75–82°F (24–28°C) | 7.0–7.5 | 20–50 fry per brood |
| Betta splendens | 78–82°F (26–28°C) | 6.5–7.5 | 200–500 eggs |
| Angelfish | 78–84°F (26–29°C) | 6.5–7.0 | 300–1,000 eggs |
| Goldfish | 65–72°F (18–22°C) | 7.0–7.5 | 500–1,000 eggs |
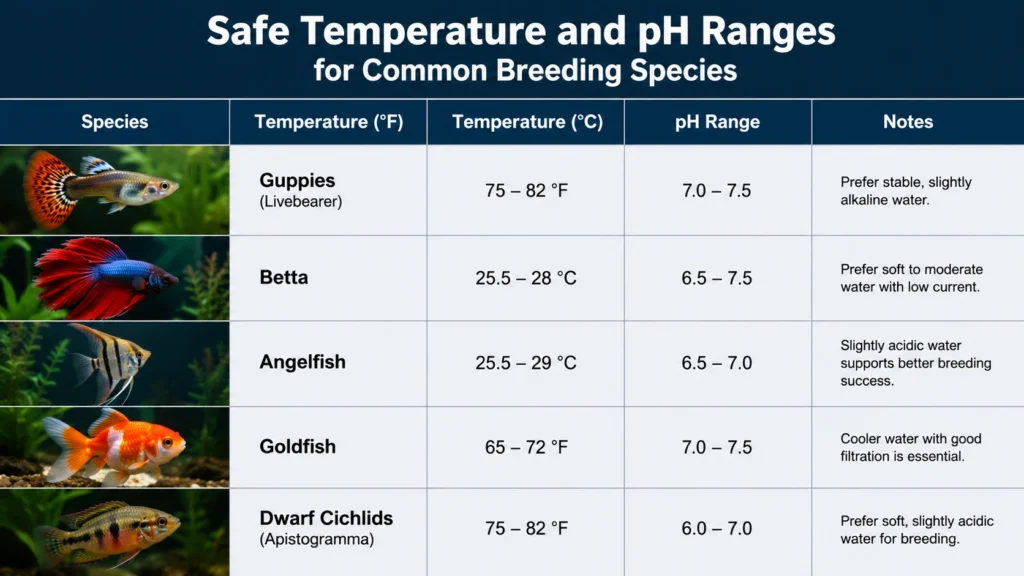
Practical takeaway: Before setting up a breeding tank, research your specific species’ natural water parameters rather than relying on generic “community tank” advice. A goldfish and a betta have almost nothing in common in terms of ideal breeding conditions.
Best Test Kits (Liquid vs Strips) — Which Actually Works
Test strips are convenient but notoriously inconsistent, particularly for ammonia readings, where color-matching errors can lead to a false sense of security. Liquid reagent test kits — while requiring a few extra minutes per test — are significantly more accurate and remain the standard recommendation among experienced breeders and many fishkeeping resources.
Best practice: Test ammonia, nitrite, and nitrate at minimum twice weekly in an active breeding or fry tank, and daily during the first two weeks after fry hatch, when bioload changes rapidly as fry grow.
Testing tells you where a problem exists — but prevention through proper filtration is what actually keeps that problem from developing in the first place.
Setting Up a Filtration System That Actually Works
Filtration in a breeding tank has to accomplish two competing goals: process waste effectively while remaining completely safe for fragile, often microscopic fry. Standard filtration equipment designed for adult fish frequently fails at the second goal.
Why Sponge Filters Are the Breeder’s Go-To Choice
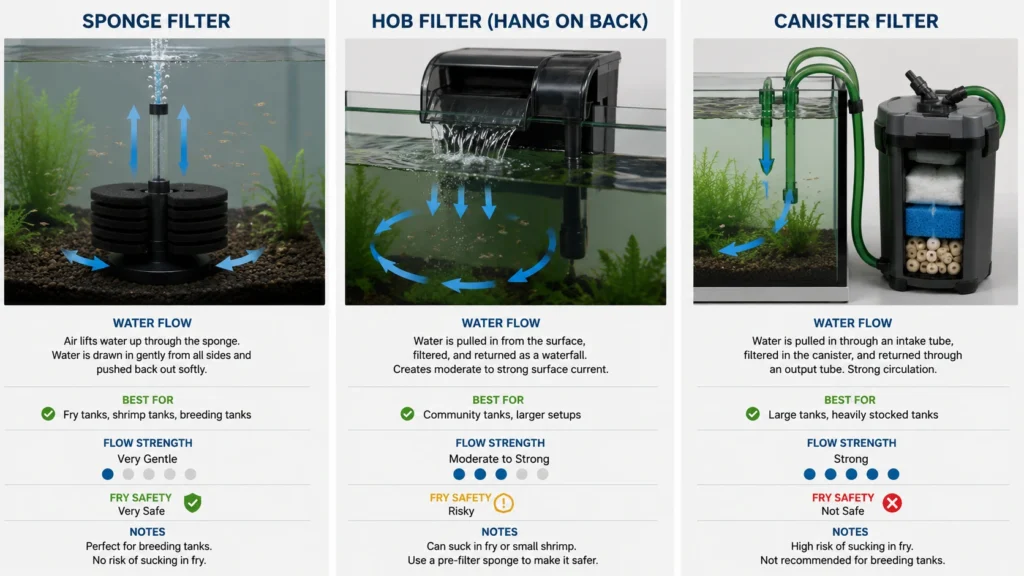
A sponge filter operates using gentle air-driven suction pulled through a porous foam sponge, which simultaneously provides mechanical filtration (trapping debris) and biological filtration (housing colonies of beneficial nitrifying bacteria). Because the water flow is slow and diffuse rather than a concentrated intake, there’s no risk of fry being pulled in or injured — a real concern with standard filter intakes.
Sponge filters are also inexpensive, typically available for $10–20, and easy to clean without disrupting the biological filtration they provide, provided they’re rinsed correctly (more on that shortly).
Sponge Filter vs HOB vs Canister — Comparing Options
| Filter Type | Fry Safety | Filtration Strength | Best Use Case |
|---|---|---|---|
| Sponge filter | Excellent | Moderate | Fry tanks, breeding tanks |
| Hang-on-back (HOB) | Poor without guard | Strong | Adult/display tanks |
| Canister filter | Poor, strong intake | Very strong | Large adult tanks, not fry-safe |
HOB and canister filters can be made safer with fine mesh intake guards, but for tanks specifically housing eggs or newly hatched fry, a sponge filter remains the safer default choice recommended by most experienced breeders.
How to Cycle a Breeding Tank Before Adding Fry
Ideally, a breeding tank should be fully cycled 2–4 weeks in advance, meaning ammonia and nitrite both consistently test at 0 ppm across several days of monitoring before fish or fry are introduced. This can be achieved by seeding the new tank with established filter media, gravel, or water from a healthy, already-cycled aquarium — a technique often called “seeding” that dramatically speeds up bacterial colonization.
What beginners usually do wrong: Setting up a breeding tank the same day fish are ready to spawn, without any cycling period at all. This leaves zero biological filtration in place right when waste production is at its highest — a near-guaranteed path to an ammonia spike.
Even a properly cycled tank with excellent filtration still requires one more critical habit to stay stable long-term: consistent water changes.
Water Change Routine for Breeding Tanks
Filtration processes waste, but it doesn’t eliminate the byproducts of that process — nitrate still accumulates, and the only reliable way to remove it is through routine water changes.
How Often Should You Change Water (Fry vs Adult Tanks)
Fry tanks generally need more frequent, smaller water changes than adult tanks because their smaller water volume relative to bioload causes parameters to shift faster.
- Fry tanks: 10–20% water changes every 2–3 days
- Adult breeding pairs (stable, cycled tank): 20–30% weekly
Step-by-Step Safe Water Change Process
- Match new water temperature within 1–2°F of the existing tank water.
- Add a water conditioner/dechlorinator to the new water before adding it — every time, without exception.
- Pour new water slowly along the tank wall or onto a decoration, never directly onto fry.
- Siphon out old water gently, keeping the siphon tip away from areas where fry are resting or feeding.
Common Mistakes That Shock Fry During Water Changes
Sudden temperature differences are one of the most frequent causes of fry stress during water changes — even a swing of just 3–5°F can trigger shock in newly hatched fish. Skipping dechlorinator is another frequent error, since chlorine and chloramine damage gill tissue almost immediately on contact. Rushing large water changes (30%+ at once in a fry tank) is also risky, since it causes a sharp, sudden shift in water chemistry that fragile fry aren’t equipped to handle.
Best practice: Smaller, more frequent water changes are almost always safer for fry than larger, less frequent ones.
A consistent water change routine handles the baseline maintenance — but ammonia can still spike between changes if feeding and bioload aren’t managed carefully.
How to Prevent Ammonia Spikes in a Breeding Tank
Preventing ammonia spikes before they happen is far easier — and far less risky for fry — than trying to correct one after the fact.
Overfeeding — The Number One Cause of Ammonia Spikes
Uneaten food decomposes quickly, releasing ammonia directly into the water and often going unnoticed in a small breeding tank until a test reveals the damage already done. The standard recommendation is to feed fry small amounts 2–3 times daily, offering only what can be consumed within roughly two minutes. If food remains visible on the substrate five minutes after feeding, the portion size needs to be reduced.
Using Ammonia Detoxifiers and Biological Boosters Safely
Water conditioners containing ammonia-detoxifying compounds (such as Seachem Prime) can temporarily bind ammonia into a less toxic form, buying time in an emergency situation. Bacterial supplements designed to introduce nitrifying bacteria can also help jump-start biological filtration in a newly set-up tank.
Important disclaimer: These products are useful emergency tools, not substitutes for proper cycling and regular water changes. Relying on them long-term instead of addressing the root cause of ammonia buildup is a common mistake that tends to catch up with breeders eventually.
Recognizing Ammonia Stress in Fry
Signs that fry are already experiencing ammonia stress include gasping at the water surface, clamped fins, unusual lethargy, or fry congregating near the bottom instead of swimming actively. If any of these signs appear, test ammonia immediately and perform a partial water change without delay — this is a situation where waiting even a few hours can matter.
Once ammonia is under control and water stays consistently stable, the final piece of the puzzle is building a maintenance rhythm that’s realistic to maintain long-term.
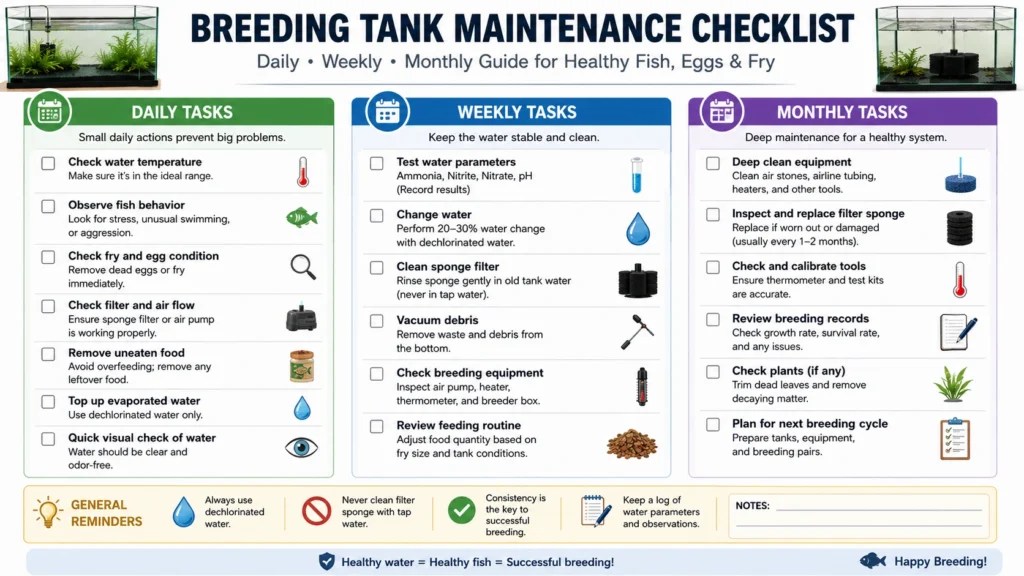
Daily, Weekly, and Monthly Breeding Tank Maintenance Checklist
A sustainable maintenance schedule matters more than an occasional deep clean — consistency is what actually keeps a breeding tank stable over weeks and months.
Daily Checks (5 Minutes or Less)
- Observe fry behavior and confirm active, normal swimming
- Check temperature against your target range
- Remove any visibly uneaten food after feeding
Weekly Maintenance Routine
- Test ammonia, nitrite, and nitrate
- Perform scheduled partial water change
- Rinse sponge filter media in removed tank water only — never under tap water, which contains chlorine that will kill the beneficial bacteria colonizing the sponge
Monthly Equipment Checks
- Verify heater accuracy using a separate, independent thermometer
- Inspect air pump tubing and air stones for clogs or reduced output
- Check test kit reagent expiration dates, since expired reagents can produce inaccurate readings without any obvious indication
Healthy Breeding Tank Tips for Long-Term Success
Choosing the Right Tank Size for Stability
Larger water volumes dilute waste more effectively and give a wider margin for error when something goes slightly wrong. A 10-gallon tank is generally considered a reasonable minimum for most fry-rearing setups, offering more chemical stability than smaller containers commonly used for eggs and newly hatched fry.
How Live Plants Naturally Support Water Quality
Live plants such as java moss, hornwort, and duckweed absorb ammonia and nitrate directly as nutrients for growth, providing a natural, ongoing reduction in toxin levels alongside biological filtration. Fast-growing, low-maintenance species tend to work particularly well in breeding tanks, since they require minimal additional care while offering meaningful water quality benefits.
Building a Maintenance Routine You’ll Actually Follow
The most effective water care routine is the one that realistically fits into your schedule and gets followed consistently — not an ambitious plan that gets abandoned after two weeks. Simplifying tasks, setting phone reminders, and keeping a written log of test results and water changes all help turn good intentions into an actual habit.
Frequently Asked Questions
How often should I change water in a breeding tank? Fry tanks generally benefit from 10–20% water changes every 2–3 days, while stable adult breeding tanks typically do well with a 20–30% weekly change.
What’s the safest ammonia level for fry? The target is 0 ppm at all times. Readings above 0.25 ppm should prompt an immediate partial water change and investigation into the cause.
Do I need a filter in a fry tank? Yes — a sponge filter is generally recommended because it provides biological and mechanical filtration without the risk of pulling in or injuring fry, unlike standard intake-based filters.
Can live plants really help keep breeding tank water clean? Yes. Species like hornwort and java moss absorb ammonia and nitrate as part of their natural growth process, providing an additional, ongoing layer of water quality support alongside filtration.
How do I know if my breeding tank water is unhealthy? Warning signs include cloudy water, fry gasping at the surface, clamped fins, or unusual lethargy. Testing ammonia, nitrite, and nitrate immediately is the most reliable way to confirm a problem.
How long does it take to cycle a new breeding tank? A full nitrogen cycle typically takes 2–4 weeks using standard methods, though seeding a new tank with established filter media or gravel from a healthy, cycled aquarium can shorten this significantly.
Can I use tap water directly in a breeding tank? Tap water can be used, but it must be treated with a dechlorinator or water conditioner first, since chlorine and chloramine are harmful to fish gills and beneficial bacteria alike.
Why did my fry survive the first few days but start dying afterward? This pattern often points to a delayed ammonia spike, as bioload increases once fry begin actively feeding and producing more waste than the tank’s biological filtration can initially process.
Conclusion: Your Practical Action Plan
Clean, stable water isn’t the most exciting part of fish breeding, but it’s the foundation everything else depends on — successful spawning, healthy eggs, and fry that actually survive to adulthood. Most breeding failures trace back not to bad luck, but to preventable water quality issues that go unnoticed until it’s too late.
To put everything in this guide into practice, focus on these core steps:
- Cycle your breeding tank for 2–4 weeks before introducing fish or fry, seeding it with established media when possible.
- Install a sponge filter as your primary fry-safe filtration method.
- Test ammonia, nitrite, and nitrate at least twice weekly, and daily during the first two weeks after fry hatch.
- Change water in small, frequent increments — 10–20% every 2–3 days for fry tanks — always matching temperature and using a dechlorinator.
- Avoid overfeeding, offering only what fry can consume within two minutes per feeding.
- Add fast-growing live plants to provide an additional layer of natural water quality support.
Building this system doesn’t require expensive equipment or advanced experience — it requires consistency and an understanding of what’s actually happening in the water. Once that routine becomes second nature, breeding fish stops feeling like a guessing game and starts becoming something you can reliably repeat, spawn after spawn.
Related guides you may find useful: [How to Cycle a Fish Tank Properly (Step-by-Step)], [Homemade Fish Food for Fry (Easy Recipes)], [Ideal Water Parameters for Fish Breeding Explained].

KD Sivanath is an aquarium enthusiast with over 7 years of experience in fish keeping and breeding. He specializes in helping beginners learn simple and effective methods for breeding popular aquarium fish. Through this blog, he shares practical tips, real-life experience, and easy-to-follow guides to help anyone start and succeed in fish breeding.